TDR Moto 700c/29er Front Wheel E-Bike Conversion Kit Review
 So, how hard is it to convert a standard, common-or-garden touring bicycle to electric assist? You would be surprised! There was heartache, emotional and literal, there was swearing. My neighbours probably hate me. Let me say, right up front, I know bikes, I have the right tools and I know electronics. I found this project fucking hard!
First up, my electronics background is audio production in radio and in live music. I worked for an Australian national radio network for 27 years, doing in-studio and outside broadcast audio. Before that, I studied electronic engineering to just shy of an Associate Diploma but work and putting bread on the table got in the way of my exams. When I say I know electronics, I don't just know how mix sick beats, I know how to run a studio, how to do a live mix, how to set up the sound system. Put me in a venue with sound system I've never used before, I'll have it making noise in time for doors open. I'll have the mix dialled like Giles Martin by third song. Even if the gear was in packing crates when I arrived and the manuals are still in their plastic bags.
I also know bicycles. As a teen, I built my first adult bicycle from scratch from my grandfather's old single speed coaster braked frame. As a project 10 years ago, while recovering from cancer, I built up a touring bicycle from a hard rubbish find. Transfered most of the parts from my Reid City 1 to a Shogun Metro frame, replaced the headset, bottom bracket, flatbar (with a drop bar and 3x7 integrated road levers) and dialled the newer bike that was the wrong size for me into a steel framed beauty. I built my dutch front loader cargo bike from an end of model frame set and hard rubbish found parts. I have maintained, improved and tuned every bicycle I own to roll like a "curly" Hetchins, to spin like a Campy equipped Pinarello, to fit me like a glove. The bicycle is the last great technological advance that even a technophobe can understand its workings. I know bikes. No formal training, just an instinct for what make a bicycle sing in tune with the road it rolls on.
SO WHEN I SAY THIS CONVERSION WAS HARD, TRUST ME, IT WAS FUCKING HARD WORK! Seriously kiddies, unless you have built a bike from scratch AND know how to connect up electronics as complicated as your local venue's digital audio system, don't for a second think you can convert your Ali Express beach cruiser to an e-bike from a conversion kit. You will be around at your local bike shop in shame, with them snickering as they work out what they "think" it might cost for them to finish the job. If you do know this stuff, you still need the proper tools, skills to improvise solutions to barely fitting parts and an understanding of how each part interconnects. These kits make your dad's 1970s stereo look as easy to hook up as a Walkman!
Did I mention the swearing? Uncommon amounts of it, even by my sweary-bear standards. Also, I had the added pressure of the missus supporting me financially in this particular project. I would have felt like an ingrate, not just a failure, if I couldn't complete. I was expecting it to be easy with my skills. It broke my brain in ways you cannot imagine.
Then it just worked, and it was done. It took 3 whole days to sort out some simple mods to make the standard front wheel motor fit my gravel bike frame, it took 2 more to wire up, tidy the wiring and find alternate locations for my tool box, frame bag and bidon. I rose on the last day of work on the project, despondent. I dreaded another day of work on it. On that day, it was done by lunchtime, test ridden straight after lunch and the pain of bike on the workstand, bike off the workstand, over and over an over again. Hours of trying to make stiff cables plug together yet somehow refusing to mate keyway to guid ridge. Yet the pain of labour vanished as I pedalled out of my driveway for the first ride.
It, so truly, was worth the effort.
For first ride, I set it to first level boost. I left out the throttle, opting for full Euro, pedal assist. I had no idea what to expect from what was literally the cheapest conversion kit available to me. What I got was half a second of no assist and, even with barely 8Nm of assist on level 1, Starting on a gentle uphil felt like starting on the flat. I felt like a kid, riding free of training wheels for the first time. I have my cycling back properly. The effort was worth it, I have been rewarded for my persistence and tenacity in the face of adversity.
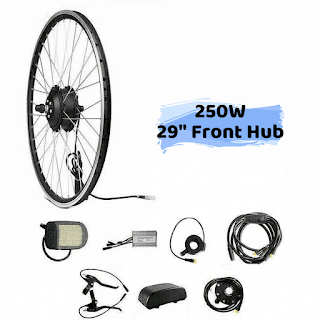
Before I talk about my first ride, lets talk about the kit itself and the after sales service. I bought this conversion kit, via eBay, from TDR Moto, a dirt bike and ebike retailer in the Melbourne suburb of Hoppers Crossing for around AU$700 including postage. It came in a single box that included a 700c front wheel with a 250w brushless hub motor, a triangular, frame-hung, 540Wh lithium-Ion battery, a charger, the motor controller, a housing for the same to mount it on the bike's frame, a wiring loom, "Chinglish" instruction manuals, Australian English disclaimer documents about warranty and usage, levers with built in brake sensors, a throttle unit, the pedal assist sensor and a mile of velcro battery mounting tapes, spiral cable wrap and cable ties. I spent another AU$40 on the "hydralic brake" magnetic sensors because I have drop bars and like my integrated road levers. The quality of all of this stuff is about lower mid-tier, like what you might find on a $1200 to $1800 e-bike in Australia.
Why only 250w and why no throttle lever? It has become nearly impossible to buy 200w e-bike motors and that's the highest power you're legally allowed to use with a throttle. I'm not a lazy fucker, I want pedal assist. I had a heart attack a few years ago, and I'm struggling to enjoy riding for a number of reasons, despite it being my happy place. It's a wheelchair for my ticker, so I want a little kick up the hills, not a motorcycle. Cycling saved my life when I had my heart attack, I wouldn't have lived through it if I hadn't been a commuter/tourist/randoneur all my life. I want to keep riding for that fitness but hills and urban start-stop riding are hard work when you have a heart failure diagnosis. European style pedal assist, at 250w, is legal on the road, too. (Worth noting that the only place in Australia where you can ride larger than 250w is private property with the express permission of the landowner. In Australia bike paths are legally part of the road network, as are walking trails where bikes are allowed. Even the local mountain bike park is illegal for more than 250w if it's Federal, State or local council owned or managed land. Don't buy a 350w or larger motor unless your mountain bike park is private property or you own a farm. The "rozzers" will confiscate the entire vehicle and issue steep fines. Same applies to Australia's helmet laws.
So, DIY kits, hey. Easy, right? Nope, See right up there at the top. I'l wait while you reread.
You're going to need some serious bike tools. Not bike shop mechanic level, but the least you'll need is a set of allen keys, pliers, the right right spanners (because you're saying goodbye to quick release and this kit is NOT compatible, AT ALL, with thru-axle systems, either), all the bottom bracket tools for your specific bike, scissors or wire cutters (for trimming the cable tie systems) and 2 extra BMX spacer washers. (Not included in the kit, you get 2 and WILL need 3 or 4 with some bikes, mine needed 3.) Worth your while getting a new bottom bracket as well, especially if you have 8 years of riding on it, like mine did. I'm lucky, I still run a BSA 68mm bottom bracket. Whatever length of BB spindle you have, you'll also need 4 or 5mm longer to accomodate the pedal assist sensor. I'll wait, off you pop to your local bike shop if you don't have these right now. Don't even open your e-bike conversion kit's box until you have these bits and bobs. You'll be buggered before you even get the new wheel in the fork.
Fit the wheel first! If your bike is a disk brake bike, you'll need to take the disk off your existing front wheel to reuse on the motor wheel from the kit. Some disk brakes won't fit! My bike came with Tektro Novelo mechanica disks, which I upgraded to mechanical actuated hydraulic disks. I now have the factory Novelo back on the front because my TRP Hy-Rd hybrid disk caliper wouldn't fit because the motor hub needs to be where the caliper bulges out to. Rummage, rummage, rummage through the bike shed near the front gate. Found it! This wheel is only a "universal fit" for rim brake bikes. Be ready to weep, swear, smash-up, whatever helps with disappointment. I also found some spacing problems specific to my aluminium fork, the hub motor touched the motor hub on the non-brake side. This where I needed the extra spacer washer. The fork needed to be "opened" another 2mm to solve this. Much more than this on aluminium is a hard no, but 2mm is fine. The spacer caused some difficulty in aligning the caliper and disk, too. That was solved by the tightest of tight alignment margins. Literally hard up against the end of the ovalised holes.
OK, you're beginning to understand why it's better to buy the whole e-bike, right? Still, this is why I'm writing all the detail here, you can do this, it just isn't easy, but it is cheaper than the whole e-bike. Pick 2 out of those 3.
Wheel sorted, and the cable loom is the easiest part on this system. There's just that bit too much cable for any size bike, but that's better than not enough. I know how to tidy cables away out of sight and mine still look ugly, even after that. Mounting the controller might be tricky, too, the battery definitely will be! I cycle tour, I have all sorts of frame bags for snacks, tools, extra bidon mounts. The battery occupies 60% of my main triangle now. I can fit a bidon, but I can't reach it. My frame bag has been replaced by a console bag. (Zefal T3, review next post) On my first long ride, I had to carry my water bottle in a backpack! The ignominy! None of these problems were insurmountable, just tiring and frustrating to find the neatest cable path that doesn't strain the wiring.
The brake sensors are safety switches that cut the power to the motor when a magnet moves away from them. I drilled and tapped M3 holes in an out-of-the-way place on my MicroSHIFT R9 levers and fed the reed switches under the hood rubber, up to the magnet. I retaped my bars with the cables under the bartape, adjacent to the brake cable, because that's how a former randoneur rolls. At this point, all that was left was to plug all the ends together, wrap the wires with spiral wrap, tie them all to the frame with cable ties in such a way that rocks and moving parts won't crush them and I was ready for first test.
If you're still here, you have the persistence to actually do this, but reread the first few paragraphs before you buy a kit, OK. And buy the tools, plus any spare parts that need replacing.
And DAMN! The brake sensors were permanently disabling the motor! Untape the bars, reposition the read switches and cables. Sounds easy, right? Nuh, uh. It took 3 goes to get the position right! Then I had to replace the double-sided adhesive tape, because the tiny square provided had run out of stick. Job stopped until the shops open. The next day, after a few more microtweaks...
Is it a good kit? Yes! After 2 rides of just a bit less than 30km each, I can honestly say I still get a workout but My ticker doesn't topout. Zone 2 for me, with heart failure, is 120BPM. Even tiny hills can punch me over 130 and 135BPM is dangerous for me. That's quite the handbrake for an endurance rider. Now, I can add a little more speed with my legs but stay within my medically mandated heart rate thanks to the motor. Rides with more elevation gain will likely have shorter range, but the battery power switch is right between my knees. I can "Mexican Overdrive" down the hills, even on level ground and only fire up the electronics when the gradient goes above a 125 BPM workrate and still select a taller gear for a bit of muscle loading. It's weird, actually. It feels easier, yeat I'm sweating. I feel my muscles after a ride, yet I recover by the next day. That kind of workout has been lost to me for more than 36 months. I can walk 6km for the same workout safely, riding the equivalent burn (30km) was pumping my heart too hard on the hills, regardless of gear. Now the battery helps, and I am happy again.
So, would I recommend an e-kit over a brand new e-bike? No! Not unless you're a bike mechanic, electrical engineer or a combination of both! Even then it may take you up to a week to do. TDR Moto have video links to how to do the main jobs but they can't help you with bike specific problems, at least not via email, and really, you buy a kit, there's no installation warranty, only faulty parts. They answered my requests but their reponses felt a bit cagey and guarded. In the end, I'd literally figured out every solution myself. This isn't poor service on their part. I wasn't complaining about problems with the parts and I couldn't take the bike to them because it was in a few pieces. It's the risk inherent in DIY, you are on your own. I chose this road because I'm on a fixed pension. Three grand for the e-bike about the same as my main bike (a $1000 steed) is too rich for my budget, even if it is my "car." Do I regret the work involved? No! I look back on the challenges and solutions with the pride of a master craftsman, as frustrating as it was at times. The kit is good value, the parts are well made and well equipped. Just allocate a week to the job, more if you're time poor.
Value for money: *****
Ease of installation: 0
Does what it says on the box: ***** (After the install, at least)
After sales service: C'mon, it's a kit, they can only replace parts that were faulty in the wrapper!
---------------------
Aggregate value: 4 stars

Comments
Post a Comment